My husband and I are leaving for St Augustine, FL on Saturday for a week long, much needed vacation. I'm so overwhelmed with all the preparations! I have to do the laundry, clean the house, leave instructions for the pet/house sitter, bathe the dogs (all five of them) get the oil changed and the car washed, take my Mom to her doctor appointment, pick up our prescriptions and pack (ugh).
All this in two days and get myself ready!! I think i can, I think i can...Is there an app for all that?
Anyway, it'll all be worth it once we're lying on that white sandy beach watching the waves roll in. Just the thought of that calms me, We'll be staying with my husbands cousin and his wife. There empty nesters like us and we'll visit other cousins and friends while we're there that we haven't seen in over five years. I'm so excited!! We love St Augustine.

I'm all about cleaning, organization, crafting, scrapbooking, DIY, going green, saving money, and my pets!
Thursday, July 19, 2012
Wednesday, July 18, 2012
FABRIC COVERED MAT- HOW TO
These simple fabric covered mats add big impact to a framed picture.
This tutorial is for creating a 8x10 mat that holds a 5x7 picture.


MATERIALS:


THE PROCESS:
1.With all your supplies laid out and ready to go, spray the back side of the fabric and the front of the mat with a generous coat of spray glue (outside).
2.Lay your glue covered fabric on a table, glue side up. Carefully place your glue covered mat face down onto the fabric. Make sure to center it, leaving equal portions on each side. Press down firmly all over the back side of the mat. Check the front of the fabric to make sure all air bubbles are out.

3.Cut off the corners of the fabric with scissors... careful to leave only a tiny margin by the corner of the mat (see close-up pic)


4.Pulling firmly, starting next to the corner, pull the fabric up over the mat, one side at a time. Press down, smoothing out all air bubbles.

5. With your knife, cut the interior of the fabric diagonally out, starting in each corner -creating an X. Trim edges.


6. Again, pull fabric up over the edge of the mat, starting in the corners. Pull firmly to ensure that the fabric is tight, especially in the corners. Use Mod-podge on your foam brush to help adhere, if fabric doesn't stick. Once all edges are in place, use Mod-podge to go over the edges of the fabric for extra security and to prevent any fraying. Also pay special attention to the outside corners. These will need a dab of Mod-podge, smoothed down with your finger, also (second photo shows how corner should look before smoothing down).


7. Let dry thoroughly and place in frame!!


MATERIALS:
- a rectangular piece of cotton fabric approx. 11x13 in. or a bit bigger (it doesn't have to be cut perfectly)
- a 8x10 mat - you can either purchase a pre-cut mat or cut your own out of mat board
- spray glue -nothing beats 3M Super 77 found at Hobby Lobby or hardware stores
- a scissor - one you don't mind getting glue on
- a sheet rocking knife with a thin blade... an x-acto knife/craft knife will work, too
- Mod-podge
- small foam brush


THE PROCESS:
1.With all your supplies laid out and ready to go, spray the back side of the fabric and the front of the mat with a generous coat of spray glue (outside).
2.Lay your glue covered fabric on a table, glue side up. Carefully place your glue covered mat face down onto the fabric. Make sure to center it, leaving equal portions on each side. Press down firmly all over the back side of the mat. Check the front of the fabric to make sure all air bubbles are out.

3.Cut off the corners of the fabric with scissors... careful to leave only a tiny margin by the corner of the mat (see close-up pic)


4.Pulling firmly, starting next to the corner, pull the fabric up over the mat, one side at a time. Press down, smoothing out all air bubbles.

5. With your knife, cut the interior of the fabric diagonally out, starting in each corner -creating an X. Trim edges.


6. Again, pull fabric up over the edge of the mat, starting in the corners. Pull firmly to ensure that the fabric is tight, especially in the corners. Use Mod-podge on your foam brush to help adhere, if fabric doesn't stick. Once all edges are in place, use Mod-podge to go over the edges of the fabric for extra security and to prevent any fraying. Also pay special attention to the outside corners. These will need a dab of Mod-podge, smoothed down with your finger, also (second photo shows how corner should look before smoothing down).


7. Let dry thoroughly and place in frame!!


Fabric Covered Book How-To
MATERIALS

1. Lay out your book and cut a rectangle of fabric larger than the size of your book... 1 to 2 inches larger on all sides (you might want to iron your cut fabric at this point if it's creased or wrinkly).

2. Spray the back side of the fabric and the outside of the book with spray glue (not in the house!). Make sure you get a good coat... and don't forget the spine of the book. It works well to clip the piece of fabric to a wire hanger with clothes pins and stand the book, spine up, like a tent to spray.
3. Next, carefully lay your fabric out (glue side up!) and place your closed book on one end. Press book firmly down, checking to make sure the fabric is smooth and securely adhered to the book cover.

4. Carefully flipping the book over, while making sure the the spine keeps contact with the fabric, wrap the other side of the fabric around the front of the book. Once again, being careful to make sure there are no air bubbles or wrinkles in the fabric.


5. Cut off all 4 corners of the fabric, leaving about 1/8 of an inch margin between the corner and the edge of the cut.

6. Make two cuts in the fabric by the spine. The cuts should line up with where the cover creases. Do this on both ends of the book.

7. Smooth the fabric over the edges of the cover on all sides. Pay special attention to the corners, making sure to pull the fabric tightly over the edges. Use Mod Podge if necessary to make sure the flaps are adhered completely.

8. Add a very thing layer of Mod Podge to the left over tabs of fabric on either side of the spine. Then using a letter opener or a butter knife, push the tabs down into the little gap between the cover and the binding.


9. Add a little Mod Podge to the the corners of the book and use your fingers to push down the fabric (if necessary) to make a clean looking corner and keep them from fraying in the future.
Let dry and display... :) YOU'RE GOOD TO GO!
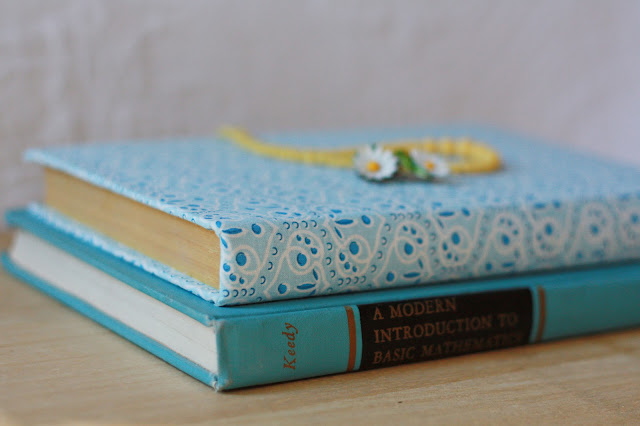
- enough cotton fabric to cover the book you've chosen... I love using vintage fabric for old books
- an old book, preferably one that has a blank cover, as some titles or illustrations can show through
- spray glue -nothing beats 3M Super 77 found at Hobby Lobby or hardware stores
- a scissor - one you don't mind getting glue on
- Mod-podge
- small foam brush
(you don't need a knife... I don't know why I put that in there, Ha!)

1. Lay out your book and cut a rectangle of fabric larger than the size of your book... 1 to 2 inches larger on all sides (you might want to iron your cut fabric at this point if it's creased or wrinkly).

2. Spray the back side of the fabric and the outside of the book with spray glue (not in the house!). Make sure you get a good coat... and don't forget the spine of the book. It works well to clip the piece of fabric to a wire hanger with clothes pins and stand the book, spine up, like a tent to spray.
3. Next, carefully lay your fabric out (glue side up!) and place your closed book on one end. Press book firmly down, checking to make sure the fabric is smooth and securely adhered to the book cover.

4. Carefully flipping the book over, while making sure the the spine keeps contact with the fabric, wrap the other side of the fabric around the front of the book. Once again, being careful to make sure there are no air bubbles or wrinkles in the fabric.


Your book should look like this at the end of step 4.

6. Make two cuts in the fabric by the spine. The cuts should line up with where the cover creases. Do this on both ends of the book.

7. Smooth the fabric over the edges of the cover on all sides. Pay special attention to the corners, making sure to pull the fabric tightly over the edges. Use Mod Podge if necessary to make sure the flaps are adhered completely.

Your books should look like this at the end of step 7.
8. Add a very thing layer of Mod Podge to the left over tabs of fabric on either side of the spine. Then using a letter opener or a butter knife, push the tabs down into the little gap between the cover and the binding.


9. Add a little Mod Podge to the the corners of the book and use your fingers to push down the fabric (if necessary) to make a clean looking corner and keep them from fraying in the future.
Let dry and display... :) YOU'RE GOOD TO GO!


After-Swimming Ear-drops to prevent infections
 Here is a simple way to get all of the
water out of your ears after swimming! This is not expensive to do and
you should have all of the ingredients in your home. This idea came from
my doctor and I thought that I should share the idea. I use it every
time I go for a swim. I would not use this product if you have an
already existing ear infection.
Here is a simple way to get all of the
water out of your ears after swimming! This is not expensive to do and
you should have all of the ingredients in your home. This idea came from
my doctor and I thought that I should share the idea. I use it every
time I go for a swim. I would not use this product if you have an
already existing ear infection. "This trick is also good to use before/after wearing earplugs for an extended time (i.e. on a plane flight, all night in a noisy hotel). I think it helps by creating a sterile environment, preventing nasty bacterial activity that could otherwise occur in a sealed environment. Also kills bacteria on your fingers that you use to roll up the earplugs.Be sure the drops in your ear have evaporated completely (wave your hands) before inserting earplugs."
How to Remove a Splinter with Baking Soda
- As you are inspecting the splinter for the first time, don't squeeze it to try and get it out.
If it's sharp, you could be embedding it further into your skin by
squeezing; if it's brittle, you might break it into smaller pieces.

- Wash and dry the spot with soap and water.
Be gentle. Pat dry (a paper towel is good for absorbing moisture
without having to apply much pressure). You don't want the skin (or the
splinter, if it's wood) to get soggy.

- Inspect it with a magnifying glass. The size of the splinter and how it's angled in your skin will help you know what's the best way to take it out. See How to Remove a Splinter
for a description of other methods you may want to try first. The
baking soda method described here is best for tiny, invisible splinters.
The baking soda paste will cause the skin to swell and push the splinter out. It's best used after other methods, since it will make the other methods (tape, tweezer ,needle) more difficult because your skin will be swollen.

- Make a paste using water and about 1/4 teaspoon of baking soda.

- Put this paste on a bandage and apply the bandage to the affected area.

- After 24 hours, remove the bandage.
The splinter may be sticking out of the skin. If it's visible, pick it
off with tweezers. Rinse the skin gently (if the splinter is sticking
out but not visible, this may wash it away). Repeat the method with new
paste and another bandage every 24 hours until the splinter is gone.


Baby Orajel
- If the splinter is extremely painful, rub a bit of Baby Orajel around the affected area and wait a few minutes before trying to remove the splinter. The Baby Orajel will numb the area. Once you wait a few minutes, wash the affected area .

Tips
- You may have to re-bandage the area twice or even three times during the 24-hour period before the splinter becomes loose enough to remove (or falls out).
- Alternate treatment: Lightly apply white glue in a thin layer to the affected area. Allow to dry. Peel the glue off for the hopeful easy removal of the small splinters. Glue conforms and gets into nooks better than tape.
Warnings
- If there is any sign of infection, seek medical advice.
- Signs of infection around the splinter may include:
- Angry redness, red streaks, swelling, skin hot to the touch, thick liquid or pus seeping out of the area.
Things You'll Need
- Baking soda
- Water
- Soap
- Bandage
- Gauze
The Benefits of Hydrogen Peroxide and its Many Uses

by Andrea Harper
Hydrogen peroxide is the only germicidal agent composed only of water
and oxygen. Like ozone, it kills disease organisms by oxidation!
Hydrogen peroxide is considered the worlds safest all natural effective
sanitizer. It kills microorganisms by oxidizing them, which can be best
described as a controlled burning process. When hydrogen peroxide reacts
with organic material it breaks down into oxygen and water.Whiten Clothes – An Alternative to Beach
Add a cup of Peroxide to white clothes in your laundry to whiten them. Peroxide is great to get rid of blood stains on clothes and carpets. If there is blood on clothing, just pour directly on the spot, let it sit for about a minute, then rub and rinse with cold water. Repeat if necessary.
Health:
Your body makes hydrogen peroxide to fight infection which must be present for our immune system to function correctly. White blood cells are known as Leukocytes. A sub-class of Leukocytes called Neutrophils produce hydrogen peroxide as the first line of defense against toxins, parasites, bacteria, viruses and yeast.
Rejuvenating Detoxifying Bath:
Use about 2 quarts 3% hydrogen peroxide to a tub of warm water. Soak at least 1/2 hour, adding hot water as needed to maintain a comfortable water temperature.
Foot Fungus:
To cure a foot fungus, simply spray a 50/50 mixture of hydrogen peroxide and water on them (especially the toes) every night and let dry.
Douche:
Add 2 capfuls of 3% hydrogen peroxide in warm distilled water once to twice a week to remove even chronic yeast infections.
Colonic or Enema:
For a colonic, add 1 cup (8 ozs.) 3% H202 to 5 gallons warm water. (Do not exceed this amount) For an enema, add 1 tablespoon of 3% H202 to a quart of warm distilled water.
Infections:
Soak any infections or cuts in 3% for five to ten minutes several times a day. Even gangrene that would not heal with any medicine has been healed by soaking in hydrogen peroxide. Put half a bottle of hydrogen peroxide in your bath to help rid boils, fungus or other skin infections.
Bird Mites Infections:
Patients infected by tiny mites report that hydrogen peroxide effectively kills the mites on their skins. They spray it on their skin a couple of times (with a few minutes in between the applications) with amazing results.
Sinus Infections:
A tablespoon of 3% hydrogen peroxide added to 1 cup of non-chlorinated water can be used as a nasal spray. Depending on the degree of sinus involvement, one will have to adjust the amount of peroxide used.
Wound Care:
3% H2O2 is used medically for cleaning wounds, removing dead tissue, and as an oral debriding agent. Peroxide stops slow (small vessel) wound bleeding/oozing, as well.
Some sources recommend soaking infections or cuts for five to ten minutes several times a day. However, washing and rinsing action is sufficient. You shouldn’t leave the solution on open tissue for extended periods of time as, like many oxidative antiseptics, hydrogen perioxide causes mild damage to tissue in open wounds. Therefore it is important to use with caution.
Personal Care:
Mouthwash / Tooth Care:Healing Properties: Take one capful (the little white cap that comes with the bottle) and hold in your mouth for 10 minutes daily, then spit it out. You will not have canker sores and your teeth will be whiter. If you have a terrible toothache and cannot get to a dentist right away, put a capful of 3% hydrogen peroxide into your mouth and hold it for 10 minutes several times a day. The pain will lessen greatly.
Mouthwash: Many people don’t realize that hydrogen peroxide makes a very effective and inexpensive mouthwash. Use 3% H202 – add a dash of liquid chlorophyll for flavoring if desired.
Toothpaste: Use baking soda and add enough 3% H202 to make a paste. Or, just dip your brush in 3% H202 and brush. Soak your toothbrush in hydrogen peroxide to keep them free of germs.
Toothbrush: Soaking your toothbrush in hydrogen peroxide will help keep them free of harmul germs.
Tooth Ache: Hydrogen peroxide is not a pain killer; however, as an anti-viral, antibacterial and anti-fungal agent, it is effective at treating the pathogen that is causing the infection. The following is from my own personal experience: My dentist wanted to give me a root canal some time ago as one tooth was inflamed and, in her opinion, would die. I felt some discomfort but told her that I would give it chance to heal. I rinsed with hydrogen peroxide (several times a day) as well ascoconut oil (once a day). The discomfort went away and I have had no further problems with the tooth.
Tooth Whitening: Having used 3% Hydrogen Peroxide as a mouth wash for sometime ago, I am thrilled to note that my teeth have been beautifully and effortlessly whitened. I used to pay so much for professional whitening, those silly strips and uncomfortable trays. Live and learn.
NOTE: Do not swallow any peroxide. When the peroxide rinse is done, be sure to rinse out your mouth with water.
Colonic or Enema:
For a colonic, add 1 cup (8 ozs.) 3% H202 to 5 gallons warm water. (Do not exceed this amount) For an enema, add 1 tablespoon of 3% H202 to a quart of warm distilled water.
Hair Lightening:
Peroxide is a bleaching agent and is used for lightened hair. Dilute 3% hydrogen peroxide with water (50 / 50) and spray the solution on your wet hair after a shower and comb it through. You will not have the peroxide burnt blonde hair like the hair dye packages, but more natural highlights if your hair is a light brown, faddish, or dirty blonde. It also lightens gradually so it’s not a drastic change.
Contact Lenses:
Hydrogen peroxide is used as a disinfectant in CIBA Vision’s Clear Care no rub contact lens cleaning solution, due to its ability to break down the proteins that build up on the lense from the eye’s immune response, resulting in increased comfort for those with sensitive eyes.
Sanitizing / Disinfectant / Cleaning
Straight or Diluted Hydrogen Perioxide:Clean your counters and table tops with hydrogen peroxide to kill germs and leave a fresh smell. Simply put a little on your dishrag when you wipe, or spray it on the counters. Use hydrogen peroxide to clean glass and mirrors with no smearing.
Keep a spray bottle of 3% (straight) to disinfect the interior of the refrigerator and kids’ school lunch boxes.
In the Dishwasher: Add 2 oz. of 3% hydrogen peroxide to your regular washing formula.
Fill a spray bottle with a 50/50 mixture of 3% hydrogen peroxide and water and keep it in every bathroom to disinfect without harming your septic system like bleach or most other disinfectants will. After rinsing off your wooden cutting board, pour or spray hydrogen peroxide (and then vinegar) on it to kill salmonella and other bacteria.
I use peroxide to clean my mirrors with, there is no smearing.
Combination of vinegar and hydrogen peroxidemake a cheap, effective and non-toxic disinfectant agent and is said to be more effective at killing pathogens than bleach. As it is non-toxic, you can use it to disinfect fruits and vegetables, as well as pet toys, equipment and cages. In tests run at Virginia Polytechnic Institute and State University, pairing Vinegar and Hydrogen Peroxide mists, kills virtually all Salmonella, Shigella, or E. coli bacteria on heavily contaminated food and surfaces.
Directions:
You need TWO spray bottles. DO NOT MIX the solutions together. Put straight vinegar in one and straight hydrogen peroxide in the other spray bottle. NOTE: Light destroys peroxide rather quickly. It’s best to leave it in its original bottle and screw in a spray head. DO NOT DILUTE THEM.
Remember for any sanitizer to work properly, the surface has to be clean before you use it.
When you want to sanitize a surface (vegetables, cutting board, counters, sink, cages, toys. toilets, floors, etc.), spray one (it doesn’t matter which one you use first) on the surface, then you spray on the other. When they mix, for a brief time the chemical action of the two make a very powerful sanitizer. You can rinse off the surface afterwards, if you want, but the result is non-toxic.
Fortunately it is cheap. BTW, we use it in the bathroom to sanitize the counters, toilets, floors, etc.
Sanitizing Drinking Water
Mold:Clean with hydrogen peroxide when your house becomes a biohazard after its invaded by toxic mold, such as those with water damage.
Humidifiers/Steamers:
Use 1 pint 3% hydrogen peroxide to 1 gallon of water.
Laundry / Stain Removing:
Stain Remover:
3% Hydrogen Peroxide is the best stain lifter if used fairly soon – although blood stains as old as 2 days have been successfully lifted with Hydrogen Peroxide. Although it will bleach or discolor many fabrics. If a little peroxide is poured onto the stain it will bubble up in the area of the blood, due to a reaction with catalase. After a few minutes the excess liquid can be wiped up with a cloth or paper towel and the stain will be gone.
3% H2O2 must be applied to clothing before blood stains can be accidentally “set” with heated water. Cold water and soap are then used to remove the peroxide treated blood.
Washing/Laundry:
You can also add a cup of hydrogen peroxide instead of bleach to a load of whites in your laundry to whiten them. If there is blood on clothing, pour directly on the soiled spot. Let it sit for a minute, then rub it and rinse with cold water. Repeat if necessary.
Peroxide is a perfect alternate solution to keep those clothes white. Also, when chlorinating clothes, they tend to wear out faster – peroxide won’t do that.
Food Preparation:
Vegetable Soak:Use as a vegetable wash or soak to kill bacteria and neutralize chemicals. Add 1/4 cup 3% H202 to a full sink of cold water. Soak light skinned (light lettuce) 20 minutes, thicker skinned (like cucumbers) 30 minutes. Drain, dry and refrigerate. Prolongs freshness.
If time is a problem, spray vegetables (and fruits) with a solution of 3%. Let stand for a few minutes, rinse and dry.
Meat Sanitizing:
You can also use it to rinse off your meat before cooking.
Leftover tossed salad:
Spray with a solution of 1/2 cup water and 1 Tbsp. 5%. Drain, cover and refrigerate.
Marinade:Spray with a solution of 1/2 cup water and 1 Tbsp. 5%. Drain, cover and refrigerate.
Place meat, fish or poultry in a casserole (avoid using aluminium pans). Cover with a dilute solution of equal parts of water and 3% H202. Place loosely covered in refrigerator for 1/2 hour. Rinse and cook.
Sprouting Seeds:
Add 1 ounce 3% hydrogen peroxide to 1 pint of water and soak the seeds overnight. Add the same amount of hydrogen peroxide each time you rinse the seeds.
Grades of Hydrogen Peroxide
A) 3.5% Pharmaceutical Grade: This is the grade sold at your local drugstore or supermarket. This product is not recommended for internal use. It contains an assortment of stabilizers which shouldn’t be ingested. Various stabilizers include: acetanilide, phenol, sodium stanate and tertrasodium phosphate.B) 6% Beautician Grade: This is used in beauty shops to color hair and is not recommended for internal use.
C) 30% Reagent Grade: This is used for various scientific experimentation and also contains stabilizers. It is also not for internal use.
D) 30% to 32% Electronic Grade: This is used to clean electronic parts and not for internal use.
E) 35% Technical Grade: This is a more concentrated product than the Reagent Grade and differs slightly in that phosphorus is added to help neutralize any chlorine from the water used to dilute it.
F) 35% Food Grade: This is used in the production of foods like cheese, eggs, and whey-containing products. It is also sprayed on the foil lining of aseptic packages containing fruit juices and milk products. THIS IS THE ONLY GRADE RECOMMENDED FOR INTERNAL USE.
G) 90%: This is used as an oxygen source for rocket fuel.
Only 35% Food Grade hydrogen peroxide is recommended for internal use. At this concentration, however, hydrogen peroxide is a very strong oxidizer and if not diluted, it can be extremely dangerous or even fatal. Any concentrations over 10% can cause neurological reactions and damage to the upper gastrointestinal tract. There have been two known fatalities in children who ingested 27% and 40% concentrations of H202. Another reports tells of a 26 month old female who swallowed one mouthful of 35% H202. She immediately began vomiting, followed by fainting and respiratory arrest. Fortunately, she was under emergency room care and although she experienced erosion and bleeding of the stomach and esophagus, she survived the incident. When she was re-examined 12 days later, the areas involved had healed (J Toxicol Clin Toxicol 90;28(1):95-100).
| Personal note: As with ANY food, drug, or supplement, using the product according to instructions is key to safety. If someone uses too much, then of course ramifications may be felt. We’ve NEVER heard of ANY harmful side effects from the correct usage of Food Grade hydrogen peroxide.In dire cases of disease, intraveneous use may be recommended. If you would like to find a doctor in your area trained in the use of intravenous H202 infusion, contact the International Bio-Oxidative Medicine Foundation (IBOM), P.O. Box 13205, Oklahoma City, OK 73113 at (405) 478-4266. They can provide names and addresses of doctors using the procedure in your area. |
35% Food Grade H202 must be….
1) handled carefully (direct contact will burn the skin- immediate flushing with water is recommended).
2) diluted properly before use.
3) stored safely and properly (after making a dilution the remainder should be stored tightly sealed in the freezer).
One of the most convenient methods of dispensing 35% H202 is from a small glass eye dropper bottle. These can be purchased at your local drugstore. Fill this with the 35% H202 and store the larger container in the freezer compartment of your refrigerator until more is needed. Store the eye dropper bottle in the refrigerator. The generally recommended dosage is outlined in the chart below.
The drops are mixed with either 6 to 8 ounces of distilled water, juice, aloe vera juice or gel.
(Don’t use chlorinated tap water to dilute the peroxide!)
Recipe to Refresh: DIY, Natural Skin Care
BEER HAIR RINSE
» Why It Works: The nutrients in hops add strength and shine to hair.
» You’ve Been Warned: Don’t try this treatment before a big event — unless you want to smell like you work at the Big Hunt.
» You’ll Need:
- 1/4 cup water
- 2 tbsp apple cider vinegar
- 1/4 cup beer (a hoppier beer, like an IPA, is ideal)
» What to Do: Mix together and use as a final rinse after conditioning, rinsing completely with warm water. Repeat every seven to 10 days.
Source: Brennan O’Farrell, stylist, Bang Salon and Spa (1519 15th St. NW, 202-588-5555)
AVOCADO FOOT SCRUB
» Why It Works: A ground avocado pit is abrasive enough to break down calluses, while the fruit’s rich flesh contains essential oils that nourish skin.
» You’ve Been Warned: This recipe takes time to prepare, but the results are worth it.
» What You’ll Need:
- 2 avocados (one for pit, and one ripe one for fruit)
- 1/4 cup cornmeal
- 1 tbsp sea salt
» What to Do: Dry out an avocado pit for a few days, then break it into several pieces with a hammer or cooking mallet. In a spice mill, coffee grinder or food processor, grind down the pit to make a gritty meal.
Scoop out second avocado and place skin aside. Mash the avocado fruit with the cornmeal, 1/4 cup of ground avocado pit and sea salt.
Gently massage the mixture into your feet in a circular motion, starting with the toes and working up to the ankles. Rinse with warm water.
Finally, take the inside of the avocado skin and rub the heel and any other callused areas. Your skin will look green at first (don’t worry, it won’t stain). Keep massaging for five to 10 minutes or until it no longer feels abrasive. Do not rinse off until your next shower.
Source: Angelika Kennedy, Skin Therapist, Blue Mercury (1619 Connecticut Ave. NW; 202-462-1300)
LEMON HONEY MASK
» Why It Works: Lemon’s citric acid closes pores and keeps skin’s PH levels in check, while honey’s enzymes and nutrients add an antibacterial factor to zap zits and moisturize.
 » You’ve been warned: There’s a serious sticky factor, so make sure your hair is tightly pulled back.
» What You’ll Need:
- 1 tbsp organic honey
- 1 fresh lemon
» What To Do: Squeeze the juice from the lemon and remove any seeds. Mix in honey and apply to damp face. Massage into skin for several minutes, then rinse with warm water.
Source: Sara Damelio, Skincando
COFFEE SCRUB
» Why It Works: Most pricey cellulite treatments use caffeine to promote circulation, deep-cleanse pores and act as a diuretic by removing excess water from your dermis. Our version uses the same stimulators — but with ingredients usually reserved for your morning cup of joe.
» You’ve Been Warned: Like the store-bought potions, this isn’t a scientifically vetted treatment. But the stimulating massage should help soften skin and could smooth out fatty areas.
» You’ll Need:
- 1 cup fresh-ground coffee
- 1/2 cup brown sugar
- 1/2 cup salt
- 1/2 cup coconut oil
» What to Do: Mix all the ingredients. Massage into thighs, butt and other areas prone to, sigh, the cottage cheese effect for five minutes in a circular motion.
Rinse when finished. Repeat three to five times per week.
Source: “Eco Beauty: Scrubs, Rubs, Mask, and Bath Bombs for Your Friends” ($20, Ten Speed Press) by Lauren Cox with Janice Cox
CHOCOLATE FACE MASK
» Why It Works: Cocoa’s natural antioxidants help clear out skin stressors that can make skin look older.
» You’ve Been Warned: It smells so good you may want to eat the leftovers.
» You’ll Need:
- 1/3 cup natural cocoa powder (no sugar added)
- 2 tbsp heavy cream
- 2 tsp cottage cheese
- 3 tsp honey
 » What to Do: Mix everything together in a large bowl.
Apply to dampened skin and leave on for 15 to 20 minutes.
Rinse with warm water. Can be used once a week.
Source: Skincaretalk.com
BAKING SODA BLACKHEAD REMOVER
» Why It Works: This gentle, quick facial uses baking soda’s acid-neutralizing alkalinity and milk’s lactic acid to clear out pores and lightly exfoliate.
» You’ve Been Warned: After years of store-bought lotions and potions, this seemed almost too simple to work — but it did.
» You’ll Need:
- 1 tbsp baking soda
- 1/4 cup milk
» What to Do: Mix all the ingredients together. Rub into blackhead-prone areas using a soft makeup sponge. Rinse and repeat if needed.
Source: “Return to Beauty” ($25, Atria Books) by Narine Mikogosian
TIPS:
1) Body scrubs can get messy in the tub or shower. Place a plastic bag at the drain to catch what falls and avoid clogs.
2) Mix ingredients in a food processor or blender when possible to remove large clumps.
3) Use fresh, organic produce to ensure potions are pesticide-and preservative-free.
4) For a foot scrub, hop up on the kitchen counter and apply it in the sink. Any gunky debris will end up in the garbage disposal, making cleanup much easier.
QUICK FIXES:
Got five minutes and a stocked fridge? Try these easy remedies.
» De-Puff Eyes
Put two thick raw potato slices over eyes for 10 minutes. The potato’s potassium and vitamin C should zap under-eye circles.
» Smooth Dry Hands
Mix 1/4 tsp of olive oil and 1/4 tsp of sugar and massage into the backs of hands. The oil will soften skin, while the sugar will slough off dead, scaly cells.
» Exfoliate Sensitive Skin
Mix equal parts honey and brown sugar and use as a face or body scrub. Brown sugar is gentler than granulated sugar, making it suited to sensitive skin.
Written by Express contributor Megan Zatko
» Why It Works: The nutrients in hops add strength and shine to hair.
» You’ve Been Warned: Don’t try this treatment before a big event — unless you want to smell like you work at the Big Hunt.
» You’ll Need:
- 1/4 cup water
- 2 tbsp apple cider vinegar
- 1/4 cup beer (a hoppier beer, like an IPA, is ideal)
» What to Do: Mix together and use as a final rinse after conditioning, rinsing completely with warm water. Repeat every seven to 10 days.
Source: Brennan O’Farrell, stylist, Bang Salon and Spa (1519 15th St. NW, 202-588-5555)
AVOCADO FOOT SCRUB
» Why It Works: A ground avocado pit is abrasive enough to break down calluses, while the fruit’s rich flesh contains essential oils that nourish skin.
» You’ve Been Warned: This recipe takes time to prepare, but the results are worth it.
» What You’ll Need:
- 2 avocados (one for pit, and one ripe one for fruit)
- 1/4 cup cornmeal
- 1 tbsp sea salt
» What to Do: Dry out an avocado pit for a few days, then break it into several pieces with a hammer or cooking mallet. In a spice mill, coffee grinder or food processor, grind down the pit to make a gritty meal.
Scoop out second avocado and place skin aside. Mash the avocado fruit with the cornmeal, 1/4 cup of ground avocado pit and sea salt.
Gently massage the mixture into your feet in a circular motion, starting with the toes and working up to the ankles. Rinse with warm water.
Finally, take the inside of the avocado skin and rub the heel and any other callused areas. Your skin will look green at first (don’t worry, it won’t stain). Keep massaging for five to 10 minutes or until it no longer feels abrasive. Do not rinse off until your next shower.
Source: Angelika Kennedy, Skin Therapist, Blue Mercury (1619 Connecticut Ave. NW; 202-462-1300)
LEMON HONEY MASK
» Why It Works: Lemon’s citric acid closes pores and keeps skin’s PH levels in check, while honey’s enzymes and nutrients add an antibacterial factor to zap zits and moisturize.
» You’ve been warned: There’s a serious sticky factor, so make sure your hair is tightly pulled back.» What You’ll Need:
- 1 tbsp organic honey
- 1 fresh lemon
» What To Do: Squeeze the juice from the lemon and remove any seeds. Mix in honey and apply to damp face. Massage into skin for several minutes, then rinse with warm water.
Source: Sara Damelio, Skincando
COFFEE SCRUB
» Why It Works: Most pricey cellulite treatments use caffeine to promote circulation, deep-cleanse pores and act as a diuretic by removing excess water from your dermis. Our version uses the same stimulators — but with ingredients usually reserved for your morning cup of joe.
» You’ve Been Warned: Like the store-bought potions, this isn’t a scientifically vetted treatment. But the stimulating massage should help soften skin and could smooth out fatty areas.
» You’ll Need:
- 1 cup fresh-ground coffee
- 1/2 cup brown sugar
- 1/2 cup salt
- 1/2 cup coconut oil
» What to Do: Mix all the ingredients. Massage into thighs, butt and other areas prone to, sigh, the cottage cheese effect for five minutes in a circular motion.
Rinse when finished. Repeat three to five times per week.
Source: “Eco Beauty: Scrubs, Rubs, Mask, and Bath Bombs for Your Friends” ($20, Ten Speed Press) by Lauren Cox with Janice Cox
CHOCOLATE FACE MASK
» Why It Works: Cocoa’s natural antioxidants help clear out skin stressors that can make skin look older.
» You’ve Been Warned: It smells so good you may want to eat the leftovers.
» You’ll Need:
- 1/3 cup natural cocoa powder (no sugar added)
- 2 tbsp heavy cream
- 2 tsp cottage cheese
- 3 tsp honey
» What to Do: Mix everything together in a large bowl.Apply to dampened skin and leave on for 15 to 20 minutes.
Rinse with warm water. Can be used once a week.
Source: Skincaretalk.com
BAKING SODA BLACKHEAD REMOVER
» Why It Works: This gentle, quick facial uses baking soda’s acid-neutralizing alkalinity and milk’s lactic acid to clear out pores and lightly exfoliate.
» You’ve Been Warned: After years of store-bought lotions and potions, this seemed almost too simple to work — but it did.
» You’ll Need:
- 1 tbsp baking soda
- 1/4 cup milk
» What to Do: Mix all the ingredients together. Rub into blackhead-prone areas using a soft makeup sponge. Rinse and repeat if needed.
Source: “Return to Beauty” ($25, Atria Books) by Narine Mikogosian
TIPS:
1) Body scrubs can get messy in the tub or shower. Place a plastic bag at the drain to catch what falls and avoid clogs.
2) Mix ingredients in a food processor or blender when possible to remove large clumps.
3) Use fresh, organic produce to ensure potions are pesticide-and preservative-free.
4) For a foot scrub, hop up on the kitchen counter and apply it in the sink. Any gunky debris will end up in the garbage disposal, making cleanup much easier.
QUICK FIXES:
Got five minutes and a stocked fridge? Try these easy remedies.
» De-Puff Eyes
Put two thick raw potato slices over eyes for 10 minutes. The potato’s potassium and vitamin C should zap under-eye circles.
» Smooth Dry Hands
Mix 1/4 tsp of olive oil and 1/4 tsp of sugar and massage into the backs of hands. The oil will soften skin, while the sugar will slough off dead, scaly cells.
» Exfoliate Sensitive Skin
Mix equal parts honey and brown sugar and use as a face or body scrub. Brown sugar is gentler than granulated sugar, making it suited to sensitive skin.
Written by Express contributor Megan Zatko
Non-Slip Hangers

Beast Soap Scum Remover
BEST soap scum remover!!

Make a vinegar "gel" by thickening vinegar with cornstarch. The vinegar CLINGS to what ever you spray it on...thus gives it more time to work. A little detergent cuts grease. I heated 1 cup of vinegar and 1 T corn starch in the microwave for 2 minutes. Add 2 T dish detergent and put it in a spay bottle. Spray. Wait 1hr. Wipe. Rinse.

Make a vinegar "gel" by thickening vinegar with cornstarch. The vinegar CLINGS to what ever you spray it on...thus gives it more time to work. A little detergent cuts grease. I heated 1 cup of vinegar and 1 T corn starch in the microwave for 2 minutes. Add 2 T dish detergent and put it in a spay bottle. Spray. Wait 1hr. Wipe. Rinse.
Cheesy Dog Biscuits
INGREDIENTS
1 cup rolled oats 1/3 cup butter 1 cup boiling water 3/4 cup cornmeal 2 teaspoons white sugar 2 teaspoons chicken bouillon granules (beef would be tasty, too!) 1/2 cup milk 1 cup shredded Cheddar cheese 1 egg, beaten 3 cups whole wheat flour
DIRECTIONS
Preheat oven to 325 degrees F (165 degrees C). In a large bowl, combine rolled oats, margarine, and boiling water. Let stand 10 minutes. Grease cookie sheets.
Thoroughly stir in cornmeal, sugar, bouillon, milk, Cheddar cheese, and egg. Mix in flour, 1 cup at a time, until a stiff dough has formed.
Knead dough on a lightly floured surface, mixing in additional flour as necessary until dough is smooth and no longer sticky. Roll or pat out dough to 1/2" thickness.
Cut with cookie cutter, and place 1 inch apart onto the prepared cookie sheets.
Bake 35 to 45 minutes in the preheated oven, until golden brown. Cool before serving. Store in a loosely covered container, although fridge or freezer work better.
Homemade Cat Treats
What You Need:
1 - 6 oz can tuna, undrained (we were out of tuna, so used canned salmon)
1 cup all-purpose flour
1 cup cornmeal
1/3 cup water
Mix all your ingredients in a large mixing bowl, adding more water or flour as needed to get a nice, workable dough.
Roll your dough to about a 1/4 inch thickness, then cut into small pieces. A pizza cutter made the job so easy!
Place your treats onto a greased cookie sheet. You don't have to worry too much about spacing them apart, since they won't rise or puff up.
Bake for 20 minutes in a 350 degree oven then let cool completely.
Refrigerate in airtight container. Since there are no preservatives they won't keep for more than a week.
Homemade Stain Remover
The Recipe:
* 1 part Dawn
* 1 part baking soda
* 2 parts hydrogen peroxide
You can use more or less depending on the size of the stains. Mix the ingredients well. Apply to the stain. We scrubbed a little with a scrub brush. We poured the extra all over and let sit for a good hour. Because we used so much dawn, and have an HE washing machine we rinsed the shirt out very well and then laundered as usual.
Borrowed from onegoodthingbyjilliee.com
Borrowed from onegoodthingbyjilliee.com
Homemade Carpet Stain Remover
filled an empty spray bottle with 1 part ammonia & 1 part HOT water, sprayed it LIBERALLY on the stain, laid the clean white towel on top of it and started ironing away! Within literally SECONDS…this is what the WHITE towel looked like.


Cleaning Makeup Brushes
Here’s a shocking statistic for you! According to an allure.com poll (published in Allure Magazine – July 2011), 45 percent of women surveyed NEVER clean their makeup brushes! Now, I am DEFINITELY not the role model for keeping makeup brushes clean (witness the photos below! ugh!)….but I DO try to clean them once in awhile…ofoccasionally…when I remember! But after reading several articles about this, I have now recommitted myself to good makeup brush hygiene.
When you think about it…good, clean brushes makes sense! I mean these things are touching your face! If you are not careful, dirty brushes can be a source of bacteria and cause skin breakouts and even minor disease.
So…how often SHOULD we clean our brushes?
Well, that depends on who you are asking. I read everything from EVERY DAY to every couple of months! But I am going to go with renowned makeup artist Bobbi Brown who says…..
“For concealer and foundation brushes, at least once a week to prevent a buildup of product. And because these brushes are used on your face, the cleaner, the better. Brushes that are used around the eyes should be cleaned at least twice a month, while all others can be washed once a month.”
Now that sounds rather reasonable. Especially after discovering THIS tip for quickly and easily cleaning makeup brushes from Allison at Petit Elefant. Allison says she picked up this tip from a makeup artist she works with.
All you need is:
rubbing alcohol
an old washcloth
a spray bottle
#1 Lay your brushes down on the washcloth and spray the alcohol on the brush bristles. Make sure they are completely saturated.
cleaning makeup brushes
#2 Then rub the makeup brush back and forth on the washcloth and just WATCH all the gunk that comes out! If your brushes are as filled with makeup as MINE were….you are going to need to repeat this process several times. Just keep spraying, rubbing until no more makeup comes off onto the washcloth.
cleaning makeup brushes cleaning makeup brushes
#3 Now this is important! Squeeze out the excess alcohol with a clean towel, reshape the brush head, and let the brush dry on a table or countertop. This will allow the brush head to dry into a perfect shape. Never let your brushes dry on a towel—the bristles can become mildewed.
Saturday, July 14, 2012
Homemade Treats to Keep your Pooch Cool
PB&Yogurt:
What you'll need:
1 large organic plain yogurt 2 tablespoons of peanut butter
Editor's note: Check to make sure your ingredients do not include xylitol, an ingredient that is extremely toxic to dogs
How to make it:
Mix the ingredients together Freeze in small bathroom cups
Doggy Chicken Broth:
What you'll need:
Chicken broth (Low-sodium) Pureed carrots
How to make it:
Mix the ingredients Freeze it in an ice cube tray Stuff into a kong
Veggie Delight:
What you'll need:
2-oz sweet peas (either frozen and pureed or use organic baby food) 2-oz sweet carrots (either frozen and pureed or use organic baby food) 4-oz beef or chicken (also either frozen and pureed or organic baby food - make sure it only contains meat and meat gravy, no onions or garlic!) 4-5 large spoonfuls organic plain yogurt
Editor's note: Check to make sure your ingredients do not include xylitol, an ingredient that is extremely toxic to dogs
How to make it:
Stir all ingredients together until well-blended and smooth Fill ice cube trays with the mix OPTIONAL: add an Old Mother Hubbard bone to use as a handle once treat is frozen Place in freezer (should be ready in approximately 1 hour)
These frozen treats will be fun for your dogs and keep them nice and cool on the hot days. Learn more about heatstroke in pets and how you can prevent it.
What you'll need:
1 large organic plain yogurt 2 tablespoons of peanut butter
Editor's note: Check to make sure your ingredients do not include xylitol, an ingredient that is extremely toxic to dogs
How to make it:
Mix the ingredients together Freeze in small bathroom cups
Doggy Chicken Broth:
What you'll need:
Chicken broth (Low-sodium) Pureed carrots
How to make it:
Mix the ingredients Freeze it in an ice cube tray Stuff into a kong
Veggie Delight:
What you'll need:
2-oz sweet peas (either frozen and pureed or use organic baby food) 2-oz sweet carrots (either frozen and pureed or use organic baby food) 4-oz beef or chicken (also either frozen and pureed or organic baby food - make sure it only contains meat and meat gravy, no onions or garlic!) 4-5 large spoonfuls organic plain yogurt
Editor's note: Check to make sure your ingredients do not include xylitol, an ingredient that is extremely toxic to dogs
How to make it:
Stir all ingredients together until well-blended and smooth Fill ice cube trays with the mix OPTIONAL: add an Old Mother Hubbard bone to use as a handle once treat is frozen Place in freezer (should be ready in approximately 1 hour)
These frozen treats will be fun for your dogs and keep them nice and cool on the hot days. Learn more about heatstroke in pets and how you can prevent it.


Friday, July 13, 2012
Extreme Couponing
Learn Extreme Coupon-ing with this FREE online class.
I've just recently learned about this awesome way of saving money. I even know people who return home with more money than they walked into the store with!
It's so crazy to think all this time I could have been saving so much money if I just took some time out of my day to cut out some pieces of paper and planned my grocery shopping. Here's how to get started:
1) CLIP IT. Right now I'm an online coupon clipper. We don't get the paper anymore but I've been considering getting the Sunday paper again cause I know I'm missing out on some amazingness (<--yes, that's a word). I prefer going to the following links:
Blog - A Thrifty Mom - Sarah is amazing at finding deals. I usually scope her blog daily to see how to save! She even has this awesome tutorial on how to coupon. Absolutely fantastic.
Coupons.com
Target Coupons
Walgreens Coupons
Red Plum
Smart Source
Walmart
Retail Me Not - This is a great source for online promotional codes, but it also has some coupons, so I like to type in my store and see if there are any deals going on.
Store coupons...ya know, the ones that are on the back of your receipt or that get printed off after your purchases! Usually they are similar to the items you've just purchased!
Coupons attached to the items you're buying! You can use them at the time of purchase!
Set up a coupon e-mail address and register it on brand name sites like: P&G. Just Google search your favorite brands. You'll be surprised what you can sign up for!
2) STORE IT. It's important to have an organized way of storing your coupons so that you utilize all of them before they expire. Plus it makes it easier to keep them in the same place. I first started out by keeping them in a ziploc bag, but that became a hot mess. I next picked up an mini expandable folder and I store them in alphabetical order. It's a lot easier to find them. My only annoyance is the fact that Target coupons are slightly longer than the folder and I have to fold them a little bit. But for now this works for me.
3) PLAN IT. This is the newest step for me, but it's the work involved that saves the big bucks.
www.couponmom.com
I first make out a menu list for the week. I know, it seems extreme but after coming home after working all day it's a relief to already know what I need to do to get dinner on the table. Plus it helps to have all the items I need to make it. It's those impromptu grocery trips that cost time and money. (Let's be honest, we've all gone in for milk and left with 10 other items). Anywho, from that menu I make the grocery list. I also add on the items we've run out of that have been written on the grocery list during the week (We keep that list stuck on the fridge)
Second, I research all the ads for the grocery stores I'll be going to. First I check through to see if there are any deals I just can't pass up. Items that I was not planning on purchasing. I look for staples and items that may not go bad right away so I can store up.
Thirdly, I start gathering my coupons that I can use. This is the fun part for me because I try to find coupons for everything I need to buy. You'll be surprised what a Google search on the leftover items brings up. A few months ago I got a coupon for a free avocado! Not kidding! So it helps to search! Check with the coupon policy for each store. Some allow you to double up the same coupon or even get money back for the difference if the coupon is more than the price of the item (<--Walmart does this!)
4) SAVE IT. Time to go shopping! I usually go once a week... unless there is a huge sale on an item. I take my list and clip my coupons to it. Then I go and purchase only the items that are on my list.
Wee-Wee Wigwams
My friend's daughter is expecting a baby boy in about 8 weeks.
The mother sent me a link for instructions to make "Wee-Wee Wigwams".
These little things are so cute and clever! They look like tiny little tee-pee's
and are used to put over the baby's little wee-wee so that he won't pee-pee on you while having his diaper changed.
Here's the link: http://www.makeit-loveit.com/2009/08/wee-wee-wigwam.html
This site also has other things for new mother's and babies. I'm hooked!
I did a little digging and found a Daddy-To-Be Survival kit at: http://joy is at home.blogspot.com/2012/06/daddy-to-be-survival-kit.html?m=1
Subscribe to:
Posts (Atom)